How to configure Multicast Paging via override code
Disclaimer!
Multicast paging only works on phones in the SAME SUBNET! If a phone is on a different LAN, it will NOT WORK. If the phone works properly and does not require this feature, we don't recommend performing a factory reset. If the phone is purchased through a third party vendor you perform these steps at your own risk and must be supervised by your IT Personnel.
Multicast paging enables you to page from one device to another or even to a group of devices that supports the multicast paging feature.
INSTRUCTIONS
1. Find the correct override code based on the manufacturer.
2. Make necessary changes to the value if needed, then copy the code.
3. Make sure that the format is correct and case-sensitive; it won't work if it's not.
4. Log in to your portal > Inventory > Hardware, look for the device(s) that need the multicast configuration, and click the pencil/edit icon.
5. Under the “Advanced” Tab, paste the code on the "Overrides" field, then hit "Save and Resync."
6. The phone should automatically reboot and reflect the changes; however, if it won't take the configuration, review the formatting of the override or manually reboot the phone.
WHAT IF THE PHONE STILL DOES NOT REFLECT THE CHANGES AFTER A RESYNC OR A MANUAL REBOOT?
A. Most of the time, an incorrect code format and/or outdated firmware will not respond to the change and needs a newer firmware version before it takes the configuration; make sure that the phone's firmware is up to date based on the manufacturer's website.
B. If a phone is manually provisioned and NOT via phones.iplogin.ca, it may or may not work.
C. If the phone is manually provisioned, it may need to be reset to factory and attempt to provision via phones.iplogin.ca (below is a link to our zero-touch article for reference)
Button 2
P1365="23"
P1366="0"
P1467="Page All"
P1468="224.0.2.60:50001"
Button 3
P1367="23"
P1368="0"
P1469="Page All"
P1470="224.0.2.60:50001"
Button 4
P1369="23"
P1370="0"
P1471="Page All"
P1472="224.0.2.60:50001"
Button 5
P1371="23"
P1372="0"
P1473="Page All"
P1474="224.0.2.60:50001"
Button 6
P1373="23"
P1374="0"
P1475="Page All"
P1476="224.0.2.60:50001"
Button 7
P23800="23"
P23801="0"
P23802="Page All"
P23803="224.0.2.60:50001"
Button 8
P23804="23"
P23805="0"
P23806="Page All"
P23807="224.0.2.60:50001"
Button 9
P23808="23"
P23809="0"
P23810="Page All"
P23811="224.0.2.60:50001"
Button 10
P23812="23"
P23813="0"
P23814="Page All"
P23815="224.0.2.60:50001"
Button 11
P23816="23"
P23817="0"
P23818="Page All"
P23819="224.0.2.60:50001"
Button 12
P23820="23"
P23821="0"
P23822="Page All"
P23823="224.0.2.60:50001"
YEALINK
multicast.receive_priority.priority="1"
multicast.receive_priority.enable="1"
linekey.2.type="24"
linekey.2.line="1"
linekey.2.value="224.0.2.60:50001"
To change the label:
HTEK
Htek Button 1
P41200="47"
P41300="224.0.2.60:50001"
P41400="Page"
Htek Button 2
P41201="47"
P41301="224.0.2.60:50001"
P41401="Page"
Htek Button 3
P41202="47"
P41302="224.0.2.60:50001"
P41402="Page"
Htek Button 4
P41203="47"
P41303="224.0.2.60:50001"
P41403="Page"
Htek Button 5
P20200="47"
P20201="224.0.2.60:50001"
P20202="Page"
Htek Button 6
P20205="47"
P20206="224.0.2.60:50001"
P20207="Page"
Htek Button 7
P20210="47"
P20211="224.0.2.60:50001"
P20212="page"
Htek Button 8
P20215="47"
P20216="224.0.2.60:50001"
P20217="Page"
POLYCOM
The following override will create two-page groups; page group 1 is "All Page," and page group 2 is "Sales." Devices that include these override settings can send pages to these two groups.
ptt.pageMode.enable="1"
ptt.pageMode.group.1.label="All Page"
ptt.pageMode.group.2.label="Sales"
feature.nonVolatileRingerVolume.enabled="1"
np.normal.ringing.toneVolume.chassis="1000"
np.normal.alert.messageWaiting.tonePattern="silent"
ptt.pttMode.enable="1"
Individual devices must 'subscribe' to one or more page groups to receive pages. The following override will allow devices to subscribe to the Sales group (group 2).
ptt.pageMode.group.2.subscribed="1"
The following override will allow devices to subscribe to both the Page All group (group 1) and the Sales group (group 2).
ptt.pageMode.group.1.subscribed="1"
ptt.pageMode.group.2.subscribed="1"
The default multicast IP address used by Polycom phones is 224.0.1.116. The default multicast port is 5001. Default values may be changed with the following overrides:
ptt.address="224.0.2.60"
ptt.port="50001"
The following steps will allow you to set up Multicast Paging on both the sender and receiver on Snom D785 phones. This will enable you to speak to receivers.
multicast_listen="on"
mc_address1="224.0.1.116:5001,volmax=1,name=main"
context_key3="keyevent F_ZONES"
Configure Paging Sender via Web GUI
- Obtain the IP address of the phone and log onto the Web GUI
- Go to Function Keys > Context-Sensitive Keys
- Select Type as Key Event, Number as Multicast Zones
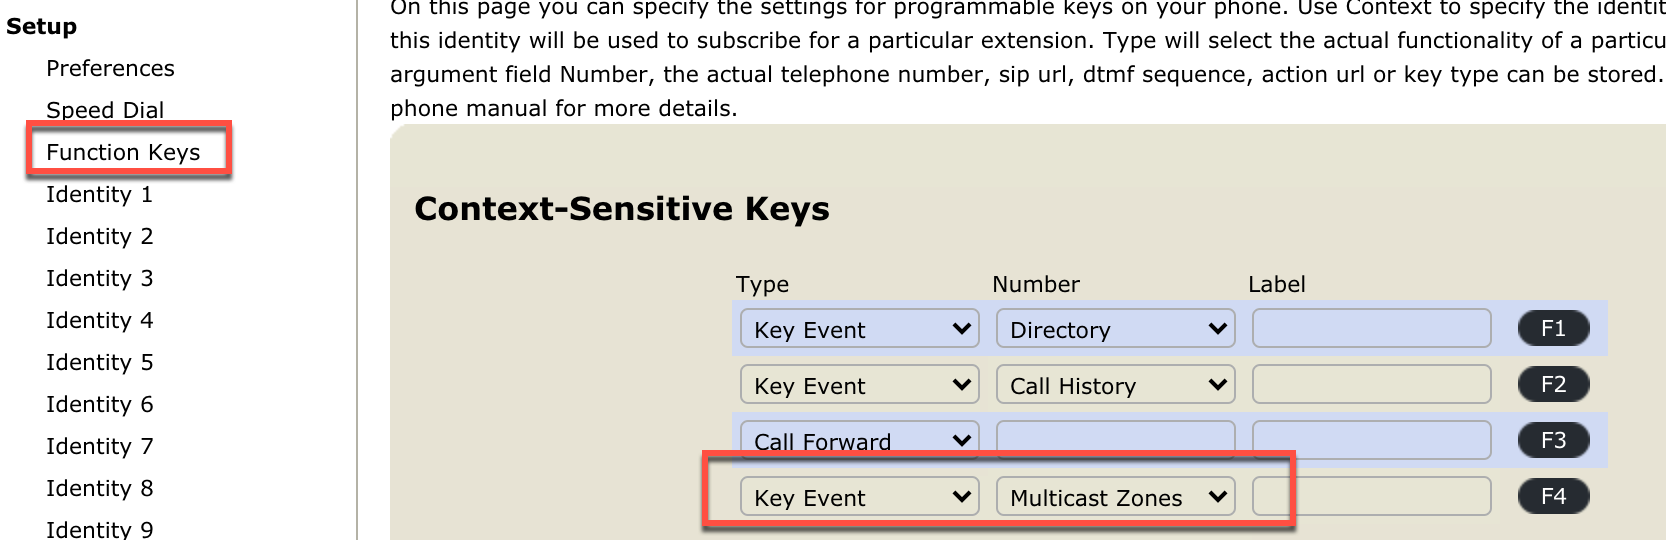
- Click Apply at the bottom of the page and then click Save Changes at the top of the page.
AVAYA
Example is for button 5. Need to set PHONEKEYX where X is the line key number and then set Key=x where x equals the line key number
-----
MP_ENABLED="1"
MP_GROUPS_TO_LISTEN="224.0.2.60:50001:1:Page All"
MP_GROUPS_TO_SEND="224.0.2.60:50001:Page All"
PHONEKEY5="Key=5;Type=feature;Name=SendMpage;attr1=224.0.2.60;attr2=50001;Forced"
pggrp="224.0.1.116:5001;name=All;num=800;listen=yes;"