Working With Users
Table of Contents
Prerequisites Adding a User Editing Users Configuring User Profiles Configuring User Answering Rules Allow/Block Numbers Adding Answering Rules Call Forward selections Changing the Active Answering Rule Editing Answering Rules Deleting Answering Rules Configuring User Voicemail Configuring Phones Associating Phones with a User Editing Phones Importing Users FlowchartPrerequisites
- Portal access with privileges higher than Office Manager scope.
- Individual users and Office Managers can manage select features by logging in under their extension.
- If you require assistance with these features, please contact support.
This article covers adding and editing user accounts. For instructions on deleting, resetting, or recycling users or extensions, see the Article "Deleting, Resetting, and Recycling Users."
Adding a User
- Click the Add User button at the top right of the Users page.

- An Add a User pop-up window similar to the following appears. (The options in your window might differ from thoseThe dial-by-name directory can match this field but will, by default, match the Last Name. below.)

- Complete the fields (see Table).
- Click Add User.
| Setting | Description |
|---|---|
| First Name | Enter the user’s first name. The dial-by-name directory can match on this field, but will by default match Last Name. |
| Last Name | Enter the user’s last name. The dial-by-name directory can match this field. |
| Extension | Enter the user’s extension. |
| Department | Enter the department to which the user belongs. (ie: Sales, Accounting) |
| Site | Enter the site to which the user belongs. (ie: New York, Toronto) |
| Email Address(es) | Enter the user’s address used for email, password resets, etc. To add email addresses, click the green plus icon. |
| User's Scope |
Select the user’s access level. Choices are the following (your selections might be different):
|
| 911 Caller ID | Caller ID number sent when calling 911. This may be different than a regular caller ID. (Only Administrators with the correct access can view and configure this) |
| Enable Voicemail |
Enable or disable voicemail. Choices are:
|
|
Add Phone Extension |
This setting allows you to add a phone extension. Phone extensions allow users to be associated with a phone. A user can have one or more phone extensions. For example, user 111 could have three phones designated as 111a, 111b, and 111c. You can associate a phone with the user if you check this check box.
|
| New Password | Enter a new numeric login password for the user. For security, each typed password character is masked by a dot ( ). ). |
| Confirm New Password | Enter the same numeric login password you entered in the New Password field. For security, each typed password character is masked by a dot (). |
Editing Users
There might be times when you need to edit users. For example, you might need to change names, passwords, answering rules, voice mail, or phone settings
From the Users page, either
- Click a name
or - Hover over a user name, click the
 icon at the far right of the Users page, and then click Profile. For example:
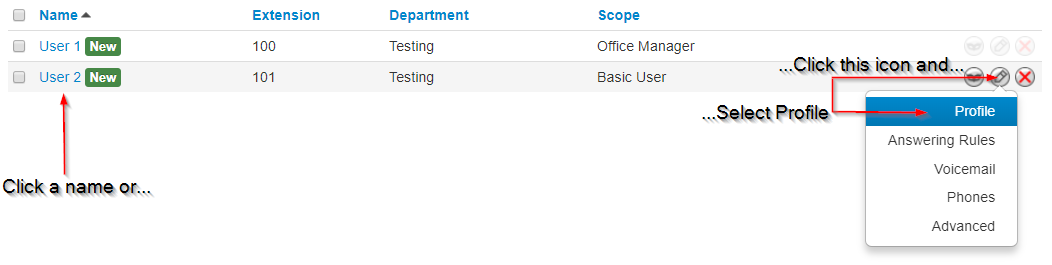
Configuring User Profiles
To configure the profile for the selected user, complete the fields in the Profile tab, and then click Save.
Note: The options in your tab might differ from those shown below.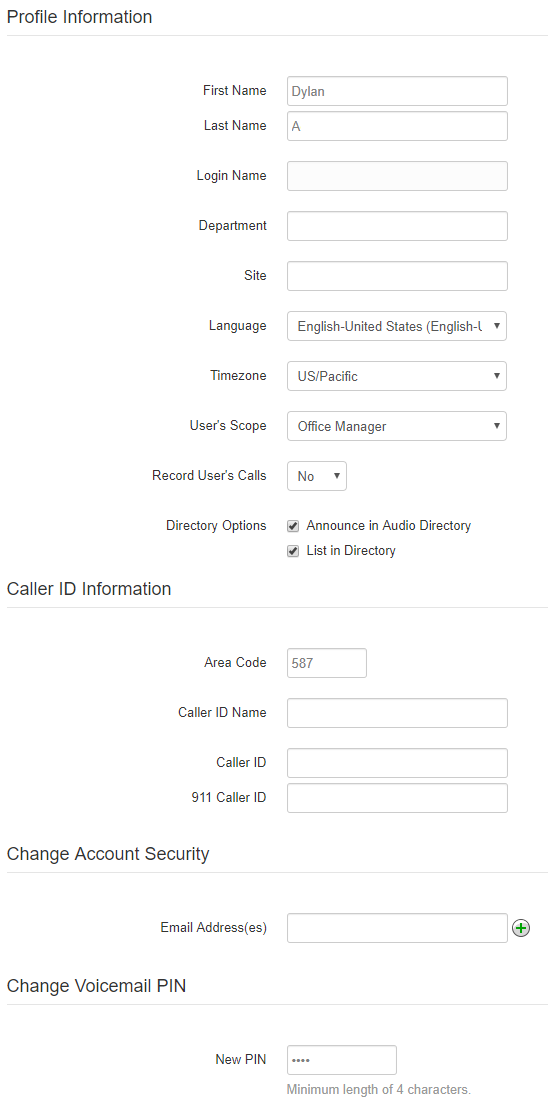
| Setting | Description |
| Profile Information | |
| First Name | Enter the user’s first name. |
| Last Name | Enter the user’s last name. The user’s last name is particularly important for the dial-by-name directory, as it matches this field. |
| Login Name | Read-only field that shows the login name this user uses to log in to the portal. |
| Department | Enter the department to which the user belongs. (ie: Sales, Accounting) |
| Site | Enter the site to which the user belongs. (ie: New York, Toronto) |
| Timezone | Enter the user’s time zone. |
| Email Address(es) | Enter the user’s address used for email, password resets, etc. To add email addresses, click the green plus icon. |
| Record User's Calls | Select whether the calls for this user will be recorded (Yes) or not recorded (No). |
| Directory Options |
Enables or disables announcements in the auto directory and lists them in directory features.
|
| Caller ID Information | |
| Area Code | Area code associated with the user. |
| Caller ID | The Caller ID number will be displayed for this user. |
| 911 Caller ID | The Caller ID number is sent when calling 911. This may be different than your regular Caller ID. (Only Administrators with the correct access can view and configure this) |
| Change Account Security | |
| New Password | Enter a new numeric login password for the user. For security, each typed password character is masked by a dot (). |
| Confirm New Password | Enter the same numeric login password you entered in the New Password field. For security, each typed password character is masked by a dot (). |
| Change Voicemail PIN | |
| New PIN | Enter a voicemail PIN for the user. |
Configuring User Answering Rules
Answering rules define how calls to this extension are handled. To configure answering rules for the selected user:
- From the Users page, click the Answering Rules tab. A page similar to the following appears.
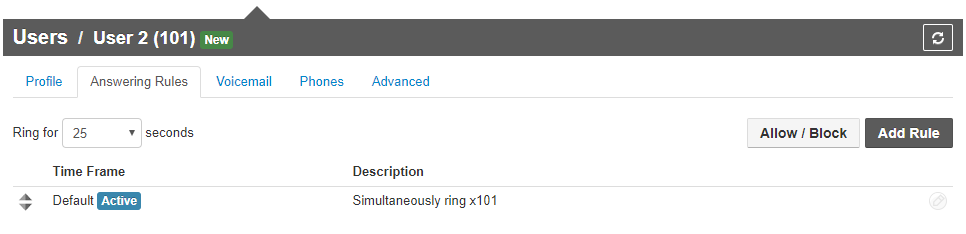
- Use the Ring for the drop-down list to select the maximum number of seconds incoming calls ring for this user before the system routes the call to the user’s voicemail or the Forward If Unanswered option if configured.
- From this page, you can:
- Allow or block calls for this user.
- Add answering rules for this user.
- Change the active rule for this user.
- Edit answering rules for this user.
- Deleting answering rules for this user.
Allow/Block Numbers
To allow or block calls for this user:
- Click the Allow/Block button. The Allow/Block pop-up window appears.
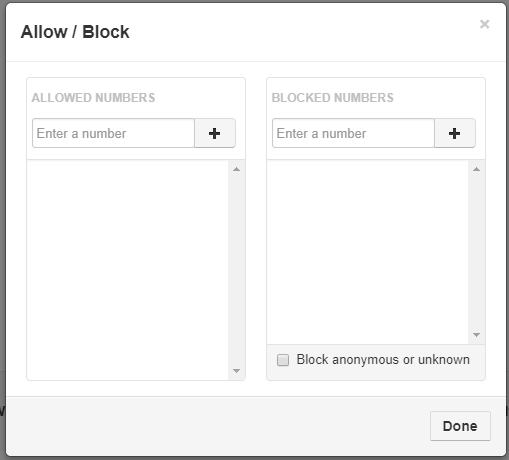
- Calls from allowed numbers bypass call screening and server-side Do Not Disturb (not phone DND). To allow numbers for this user, enter a number in the Enter a number field under ALLOWED NUMBERS and then click the plus sign next to this field. Repeat this step for each additional number you want to allow for this user.
- Calls from blocked numbers receive a fast busy or number disconnected message. to block numbers for this user, enter a number in the Enter a number field under BLOCKED NUMBERS, and then click the plus sign next to this field. Repeat this step for each additional number you want to block for this user.
- To block anonymous or unknown numbers, check Block anonymous or unknown.
- Click Done.
Adding Answering Rules
Adding additional answering rules allows you to specify alternate call answering rules in a different time frame (for example, handle calls differently on a weekend than on a weekday). To add an answering rule for this user:
- Click the Add Rule button. The Add an Answering Rule pop-up window appears.

- Complete the settings in the Add an Answering Rule pop-up window.
| Setting | Description |
|---|---|
| Time Frame | Select a time frame to which this answering rule will be applied. |
| Enabled | Add an answering rule: this check box does not appear. Edit an answering rule: enable (check) or disable (uncheck) this time frame for this user. |
| Do not disturb |
Enables or disables the Do Not Disturb feature. Choices are:
|
| Call screening |
Enables or disables the Call Screening feature. Choices are:
|
| Call Forwarding Options |
Select the following appropriate Call Forwarding settings. When entering another extension as a Call Forward option, a drop-down menu allows you to forward the call to specific resources associated with that extension. Some settings might not appear, depending on the features associated with the given extension.
|
|
Simultaneous Ring |
Simultaneous ring allows multiple phones to ring at the same time. Checkboxes allow you to include the user’s extension, ring all user phones at the same time, and use answer confirmation for offset numbers.
|
| Just ring the user's extension |
Enables or disables the ringing of your telephone only.
|
Call Forward selections
| Selection | Description |
| User | Forward calls to the user at the specified extension and follow their user-answering rules. |
| Handset | Bypass the user-answering rules and forward calls to the handset associated with the specified user. |
| Voicemail | Forward calls to voicemail at the specified extension. |
| Queue | Forward calls to the queue associated with this user. |
| Auto-attendant | Forward calls to the auto-attendant associated with this user. |
- Click Save.
- Repeat this procedure to add answering rules for this user.
Changing the Active Answering Rule
You can define multiple answering rules, but only one rule can be active at a time. The active rule is the first rule with a matching time frame. Best practices dictate that you order answering rules according to how specific they are, with the most specific time frames (for example, Holidays) at the top.
Assume today is Monday, July 4th. In this example, the Holidays and Open time frames could match the time and date conditions for July 4th. If Holidays is the first rule, it becomes the active rule. But if Open is the first rule, Open becomes the active rule.
To specify a rule other than the top one as the active rule:
- In the Answering Rules tab, find the rule you want to designate as the active rule.
- On the left side of the Answering Rules tab, hover the mouse over the up/down arrows for that rule (the pointer changes to a 4-headed arrow).

- Hold down your mouse button, drag the rule to the top row, and then release the mouse button. A message tells you that the answering rules have been reprioritized and prompts you to click Save.

- Click Save. The Active designation appears next to the topmost time frame.

Editing Answering Rules
To edit an answering rule for any user:
- In the Answering Rules tab, hover over the answering rule, and click the icon at the far right of the row.

The Edit Answering Rule pop-up window appears.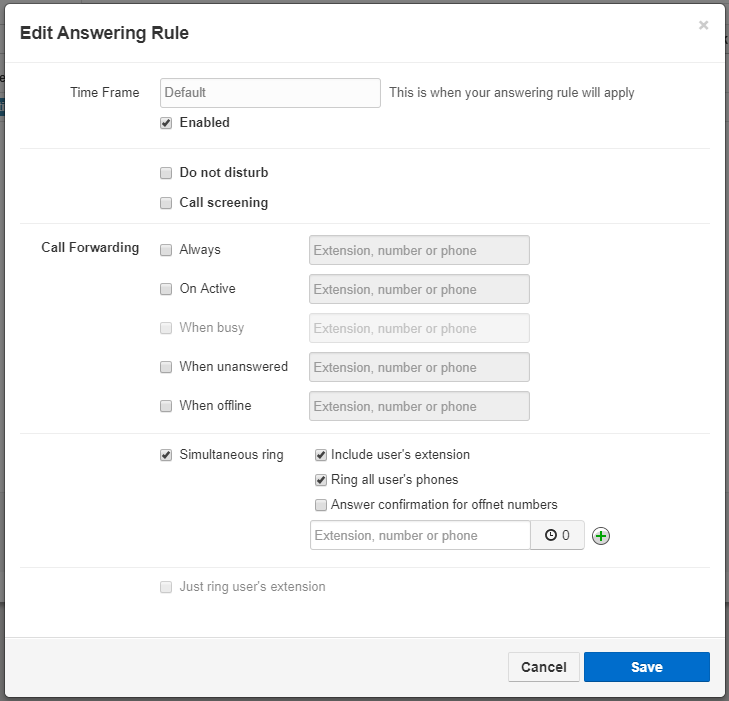
- Change the rule, as appropriate.
- Click Save.
Deleting Answering Rules
If you no longer need an answering rule for a user, you can delete it. You can delete any answering rule, except the default rule.
- In the Answering Rules tab, hover over the answering rule, and click the icon at the far right of the row.

A confirmation prompt appears. - Click Yes to delete the rule or No to retain it.
Configuring User Voicemail
To configure voice mail for the selected user:
- From the Users page, click the Voicemail tab. A page similar to the following appears.

- Complete the settings in the Voicemail tab.
| Setting | Description |
| Enable | Enable (check) or disable (uncheck) voicemail. |
| Inbox | |
| Options |
This setting affects audio voicemail (calling into voicemail), but does not affect the web portal voice messages. Check the appropriate inbox options. Choices are:
|
| Operator Forward | This setting determines where a call is sent if the caller presses 0 while the voicemail greeting is played. When using this feature, tell callers near the beginning of your recorded voicemail greeting that they can press 0 to redirect their call. |
| Number of Messages | Read-only field that shows the current count of messages. Click the Clear messages link to delete messages, but leave greetings in place. |
| Data | |
| Limit | A read-only field that shows the user's storage limit. |
| Used | A read-only field shows the user’s used storage. Click the Clear data link to delete all messages, greetings, and the name recording. |
| Greetings | |
| Voicemail Greeting |
To select an active voicemail greeting, click a greeting from the drop-down list.
To record a greeting:
|
| Recorded Name | If your company has a dial-by-name directory, you must record your name to appear in the directory. Click the icon to listen to your current name recording on your computer or click the icon to listen to your current name recording on your computer or click the icon to upload or record a new greeting. icon to upload or record a new greeting. |
| Unified Messaging | |
|
Email Notification |
Adjust your voicemail to email settings. Choices are:
|
 icon.
icon.- Click Save.
Configuring Phones
To associate phones with the selected user:
From the Users page, click the Phones tab. A page similar to the following appears. From the Phones tab, you can:
- Associate a phone with this user.
- Edit phones associated with this user.
- Delete phones associated with this user.
Associating Phones with a User
To associate phones with this user:
- Click the Add Phone button. The Add a Phone pop-up window appears.
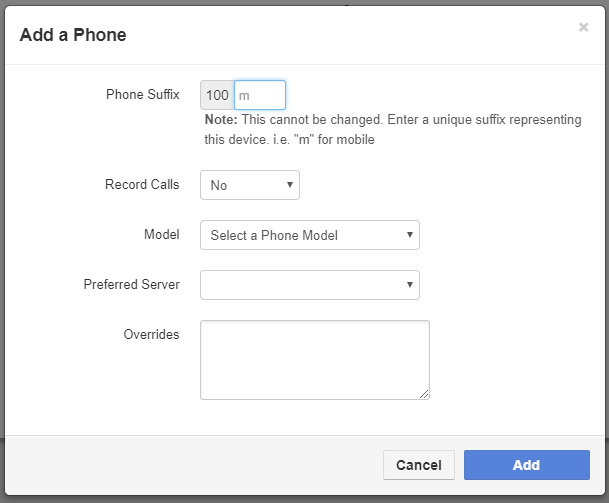
- Complete the settings in the Add a Phone pop-up window.
| Setting | Description |
| Phone Name | Adding a phone: Enter a name for this phone. The name should allow you to differentiate this phone from other phones you associated. For example, if you add phones for x111, you can name them 111a, 111b, and so on. Editing a phone: read-only field that shows the name of the phone. |
| Record Calls | Select whether calls will be recorded (Yes) or not recorded (No). |
| Model | Select the telephone model. The remaining settings in the window change depending on the model selected. |
| Preferred Server | Select the preferred server with which the phone will be used. |
| Overrides | Manual phone codes, specific to each model and firmware, which allow customization of phone features. |
- Click Add.
- Repeat this procedure to associate additional phones with this user.
- After you configure all phones, reboot the phones to apply these settings.
Editing Phones
To edit a phone associated with this user:
- From the Phones tab, either:
– Click a name
OR
– Hover over a name, and then click the icon at the far right of the page.
Either step displays the Edit Phone pop-up window. - Change the phone settings, as appropriate.
- Click Save.
Importing Users
A quick way to add users into the system is by importing them. The system accepts users in comma-separated-value (CSV) format. As part of this procedure, you can download a CSV-formatted template that can be opened using Microsoft Excel, populate the template with users, and then import the template.
From the Users page, click the Import button. The Import Users pop-up window appears.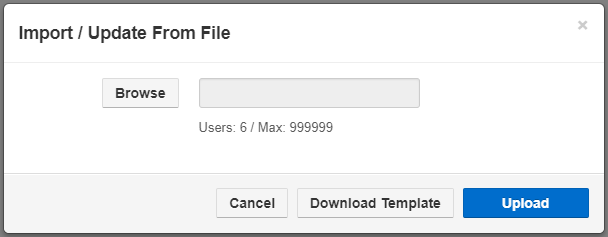
- To download a template that you can populate and import into the system:
– Click the Download Template button.
– Save the template to an area you can access.
– Open the template, populate it with users, and then save the template. - Click the Browse button, navigate to the location where the file containing the users to be imported is located, click the file, and then click Open.
- Click Upload. The system shows a preview of the data to be imported and allows you to edit the values if needed.
Flowchart
